O envio de notificações push é muito fácil e pode ser feito a partir do painel de controlo da sua aplicação no nosso sistema ou através do plugin WordPress.
Envio básico:
1. Aceda ao ecrã “enviar notificação push”.
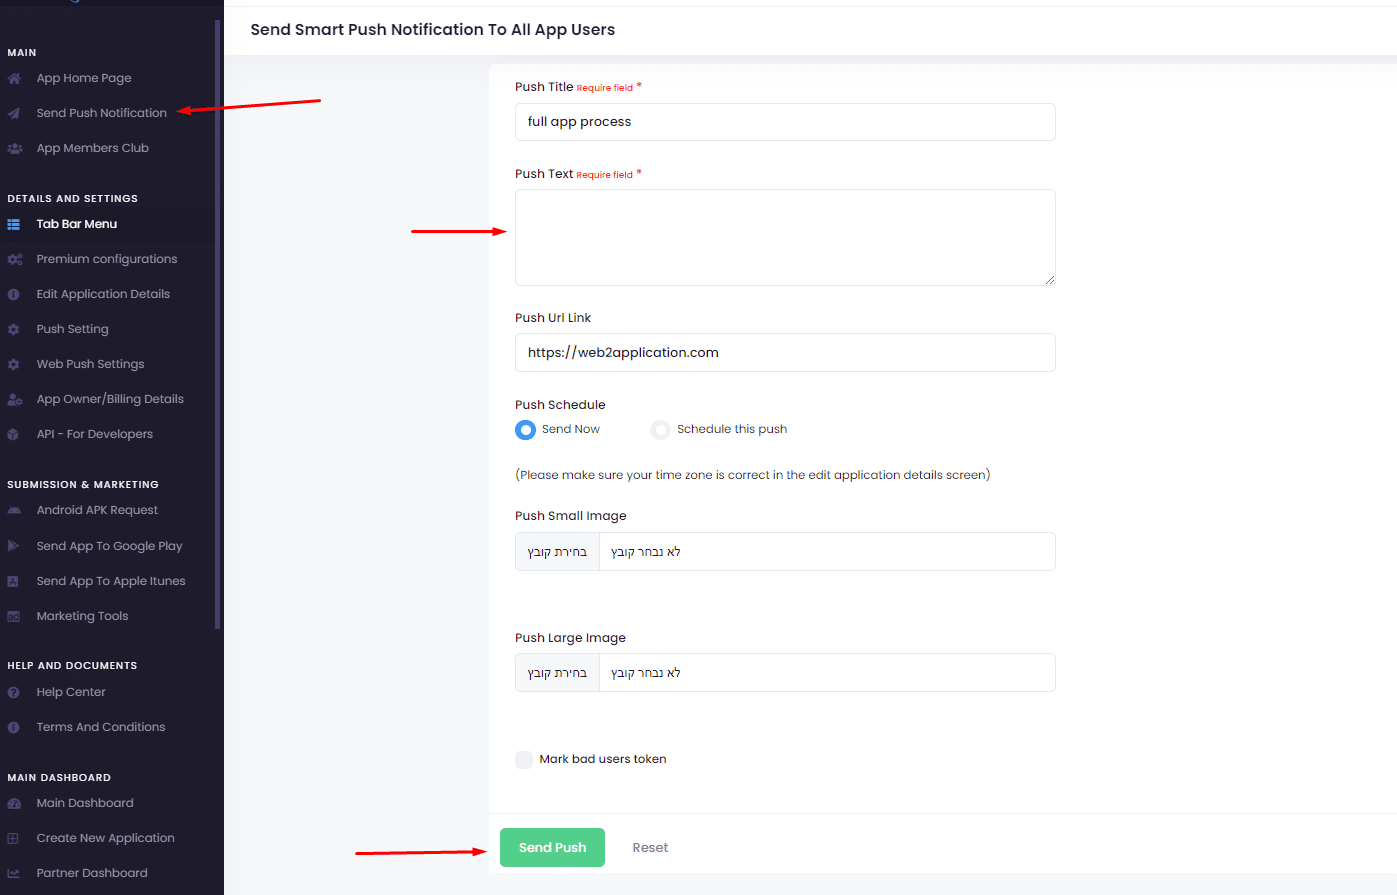
2. Escreve a mensagem push que gostarias de enviar.
3. Clique em enviar.
Notificação push com data futura:
Quando envia notificações push, pode adicionar imagens e agendar um push.
Se optar por agendar um envio, deve certificar-se de que define o fuso horário correto em “editar detalhes da aplicação”
É importante compreender uma notificação push enviada pelo Google Firebase. Entregamos os dados ao Google Firebase e o Firebase entrega as notificações aos dispositivos. Por vezes, pode demorar algum tempo até que o empurrão chegue.
Além disso, alguns dispositivos Android têm aplicações de poupança de bateria e bloqueadores de push que impedem que o push chegue quando a aplicação é fechada. Nesses casos, para verificar, tente abrir a aplicação e colocar a aplicação em segundo plano. Em seguida, envie um push de teste.
How to Send Push Notifications with Web2Application
Sending push notifications is simple with Web2Application. You can send notifications directly from your app dashboard or through our WordPress plugin if your site uses WordPress.
- Go to the Send Push Notification screen in your app dashboard.
- Type the message you want to send.
- Click Send to deliver your notification immediately.
Schedule Push Notifications for Future Delivery
You can also schedule push notifications to be sent at a later time. When scheduling, make sure to set the correct timezone in the Edit App Details section to ensure timely delivery.
Push notifications support images to make your messages more engaging.
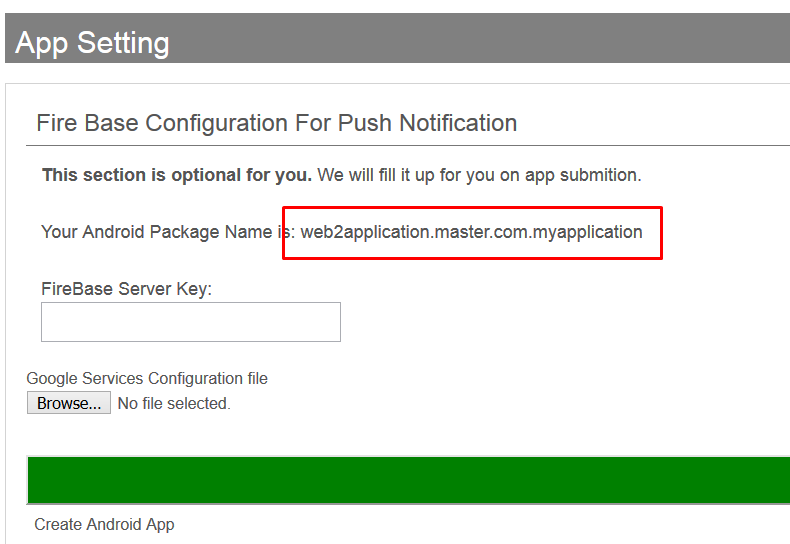
Understanding Push Notification Delivery
Web2Application uses Google Firebase to deliver push notifications. We send your message data to Firebase, which then distributes notifications to users’ devices.
Note that some delays may occur depending on device settings. Certain Android devices have battery saver apps or push blockers that can delay or prevent notifications when the app is closed. To test, open your app, send a test push, and then background the app to verify delivery.
Related Features and Resources
- How to Set Up Firebase Push Notifications
- Connect Your WordPress Site with Web2Application Plugin
- Testing Your App with APK Files
Ready to start engaging your users with push notifications? Sign up for Web2Application today and create your native app in minutes!
Frequently Asked Questions
What is the easiest way to send push notifications with Web2Application?
You can send push notifications directly from your app dashboard by typing your message and clicking send, or use the WordPress plugin if your website is WordPress-based.
Can I schedule push notifications to be sent later?
Yes, Web2Application allows you to schedule push notifications for future delivery. Just set the correct timezone in your app details to ensure accurate timing.
Why am I experiencing delays in receiving push notifications?
Push notifications are delivered via Google Firebase, and some delays can occur due to device battery saver settings or push blockers, especially on Android devices. Opening the app and sending a test push while the app is in the background can help verify delivery.
Do I need a premium plan to send push notifications?
Yes, push notification features require a premium subscription on Web2Application to unlock full functionality including scheduling and images.
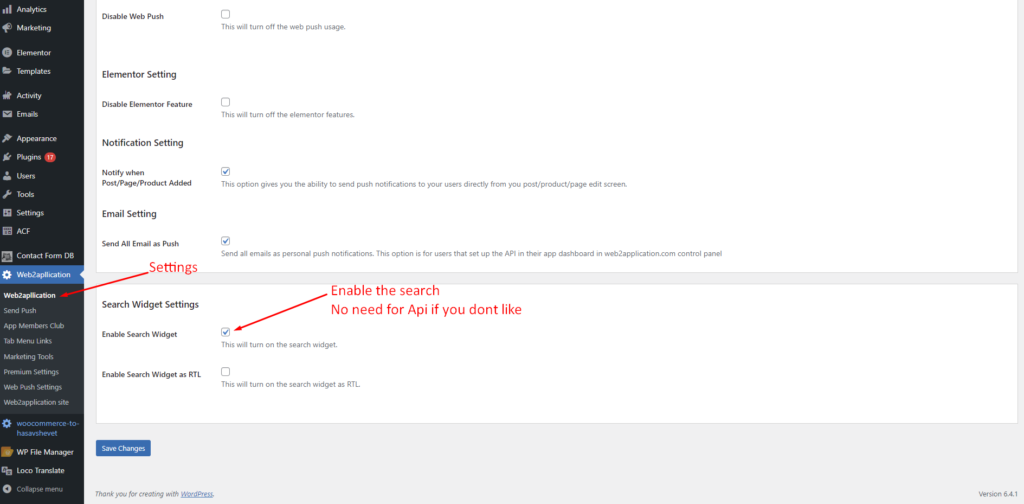
How do I connect my WordPress site to Web2Application for push notifications?
Install the Web2Application WordPress plugin and enter your API key from the dashboard to sync your site content and enable push notification features.
Ready to turn your site into an app?
Create your app with Web2Application — convert your website to Android and iOS apps.

 By
By 
