Add a bottom tab menu to your Android and iOS application
- nir
- July 23, 2023
- Dashboard, web to applicataion features
- 0 Comments
 When turning a website into an Android or iOS application, sometimes there is a navigation problem that interferes with the user browsing experience.
So, we added an option to add a beautifully designed and simple tab menu to your Android and iOS applications that will show the most popular links in your application.
It’s very easy to add the tab menu to your applications.
Please enter your app dashboard in our system and choose the “app menu” from the side main menu.
On this screen you will see all the tab bar menu that you can configure and create your perfect menu for your users:
1. Set the menu colors.
You can set the menu background and the menu links.
Just click and select the color that you want.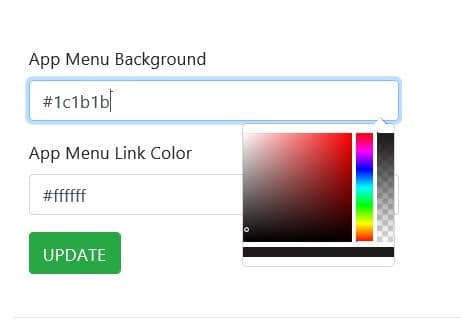
2. Menu direction.
Sometimes, according to the phone settings language there is a need to change the direction of the menu from left to right to right and left.
After you add the menu, just check that the direction is okay, if not, change the direction.

3. Activate a special tab to display your Push notifications history.
The special push notification history tab will let your users click and see all the push notifications that you send for the last months in a case that they miss.
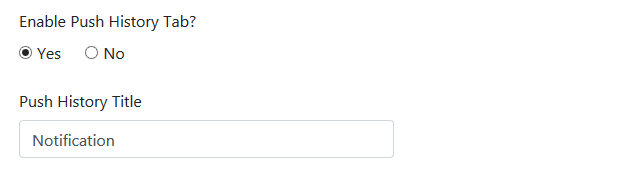
You can also customize the tab name to your own language by changing the push history tab title.
4. Add tabs to your menu.
Those are the tabs of your menu. Each tab needs to have a link to the correct page or category in your website, icon or image, title to the tab, and a number to his location on the menu.
Please don’t use long titles because the tab space is small.
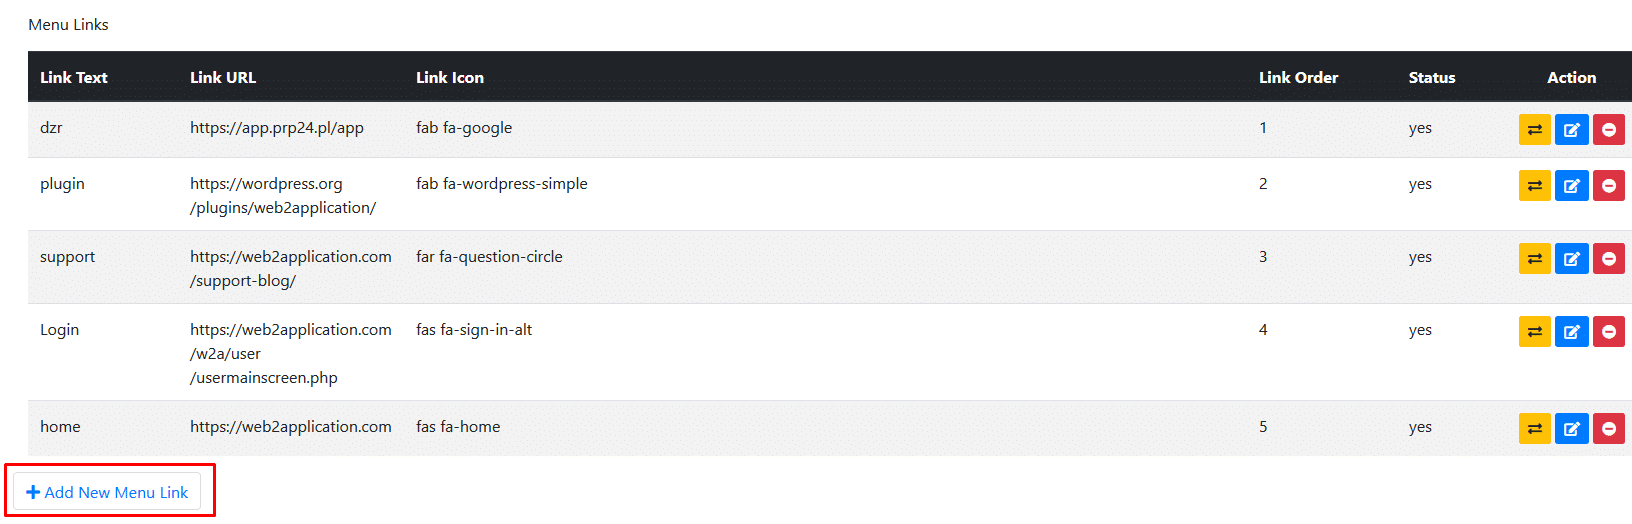
5. Edit Link and Tab Name.
In case that you like to edit the tab name, you can click on the blue button and edit the tab details.
Please don’t forget to click on the green button to approve the changes.

6. Set icons or upload an image to any tab in the menu.
Each tab needs to have an icon or image that you can upload.
For your convenience, we added a lot of icons that you can select from. You can select from the list or use the search bar to search for your icon.

Please note that there is no need to resubmit the application to google and apple in order to add or remove the tab bar menu from your application or making changes in the tabs.
It’s all automatic in your premium application.
How to Add a Bottom Tab Menu to Your Android and iOS Application
When converting your website into a hybrid Android or iOS app with a native shell using Web2Application, creating an intuitive navigation experience is essential. Adding a bottom tab menu helps users quickly access popular pages and features.
- Access Your App Dashboard: Log in to your Web2Application dashboard and select your app.
- Navigate to the App Menu: From the side main menu, choose App Menu to open the tab bar configuration screen.
- Customize Menu Colors: Set your preferred background and link colors for the tab menu to match your brand.
- Set Menu Direction: Adjust the tab menu direction (left-to-right or right-to-left) based on your app’s language settings.
- Enable Push Notification History Tab: Activate a special tab that displays your users’ push notification history. You can rename this tab to suit your language.
- Add and Manage Tabs: Add tabs by linking them to specific pages or categories on your website. Assign each tab a title, icon or image, and position number. Keep titles short for better display.
- Edit Tabs Easily: Use the edit button to change tab names or links. Remember to save changes by clicking the green approval button.
- Select Icons or Upload Images: Choose from a wide selection of icons or upload your own images for each tab to enhance visual appeal.
Important: Changes to the bottom tab menu are applied automatically to your premium app without needing to resubmit to Google Play or Apple App Store.
Adding a bottom tab menu with Web2Application improves app navigation, user engagement, and overall experience.
Create Your App Free and generate a test APK today. Explore Premium features including the customizable bottom tab menu with a 14-day trial.
Related Resources
- Enable Push Notifications in Your App
- How to Test Your Android and iOS App with APK
- Submit Your App to Google Play and Apple App Store
Frequently Asked Questions
How do I add a bottom tab menu to my Android and iOS app using Web2Application?
Log in to your Web2Application dashboard, select your app, go to the 'App Menu' section, and customize your bottom tab menu by adding tabs, setting colors, icons, and menu direction. Save changes to apply them instantly without resubmitting your app.
Can I change the bottom tab menu without resubmitting my app to stores?
Yes, if you have a premium Web2Application app, any changes to the bottom tab menu are updated automatically without needing to resubmit your app to Google Play or Apple App Store.
Is it possible to add a push notification history tab to the bottom menu?
Yes, Web2Application allows you to activate a special tab that displays your users' push notification history. You can customize the tab's title to your preferred language.
Do I need technical skills to customize the bottom tab menu?
No, Web2Application provides an easy-to-use dashboard with intuitive controls to add and edit tabs, set colors, icons, and menu direction without coding knowledge.
Ready to turn your website into an app?
Create your Android and iOS app without coding. Start free, generate a test APK, and explore Premium features with a 14-day trial.