What Really Changes When You Turn Your Website Into an iPhone App? A Visual Guide to Enhanced User Experience
- nir
- July 2, 2026
- Marketing
- Marketing AI
- 0 Comments
Why Turn Your Website Into an iPhone App in 2024?
In 2024, users expect seamless, app-like experiences on their mobile devices. If you’re a website owner, you’ve likely noticed that even the best mobile-optimized sites can’t match the polish and performance of a native iOS app. That’s why more businesses are searching for ways to turn website into app iPhone—without hiring developers or learning to code.
But what actually changes for your users when you make this leap? Let’s break down the differences, benefits, and practical steps to get your app live on the App Store—using a no-code platform like Web2Application.
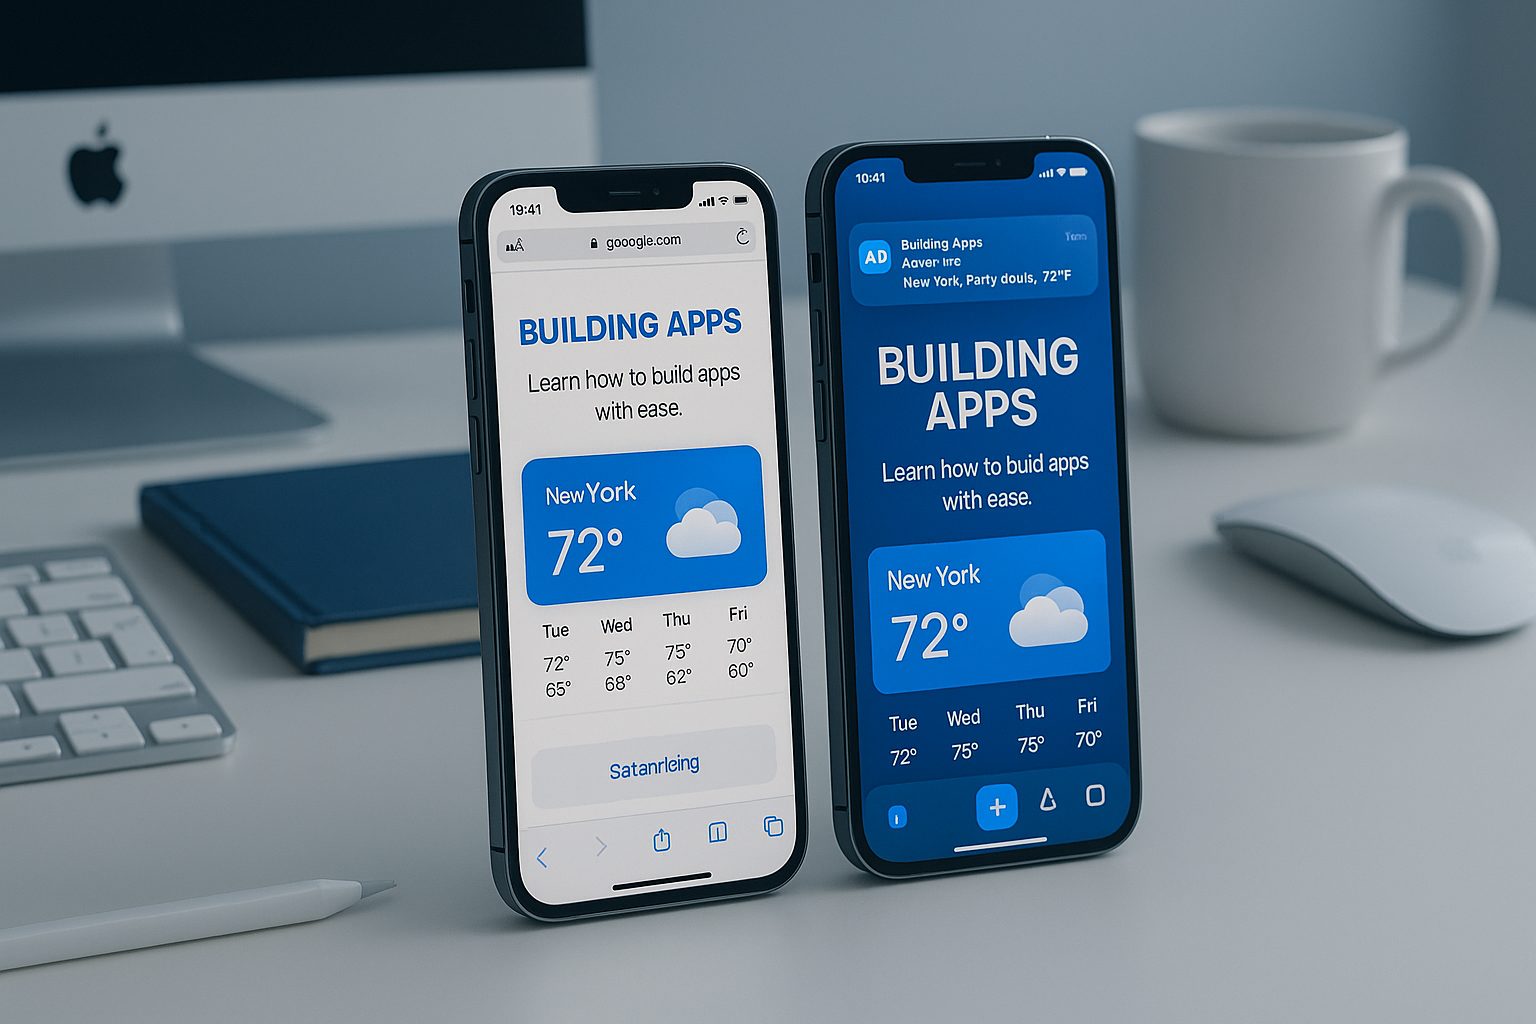
What Stays the Same — and What Gets Better: Website vs. iOS App
Website in Safari
- Loads in browser tab
- Standard mobile navigation
- Limited access to device features
- No push notifications
- Must re-enter URL or bookmark
Native iPhone App
- Custom app icon & splash screen
- Bottom tab bar & gestures
- Push notifications direct to device
- Offline content & caching
- App Store presence & discoverability
The core content stays the same—but the user experience is transformed. Your brand becomes part of the iPhone home screen, with smoother navigation and direct engagement tools.
Key Native Features You Unlock
- Push Notifications: Instantly re-engage users with news, offers, or updates—even when they’re not browsing your site.
- Offline Access: Let users view recent content or products even without an internet connection.
- App Navigation: Custom bottom tab bar, side menus, and gesture support for a true app feel.
- Home Screen Presence: Your icon and splash screen boost brand recognition and repeat visits.
- Native Sharing & Integrations: Use iOS share sheets, maps, phone, and more.
These features are easy to add with Web2Application—no coding required.
Step-by-Step: Turning Your Website Into an iPhone App With Web2Application
- Sign Up: Create a free account on Web2Application.
- Create New App: Enter your website URL, choose iOS as your target platform.
- Customize Design: Upload your app icon, splash screen, and select color themes.
- Configure Features: Set up bottom tab navigation, enable push notifications, and connect your WordPress site (if applicable).
- Preview & Test: Download the test APK or use Apple TestFlight to see your app in action before launch.
- Submit to App Store: Follow Web2Application’s guided process to prepare your app for Apple’s review and listing.
How to Add iOS-Exclusive Features Without Coding
- Push Notifications: Use the dashboard to link your app with Google Firebase, then send notifications directly from Web2Application.
- App Navigation: Add a bottom tab bar, side menu, or custom navigation—all visually, no code needed.
- WordPress Integration: Install the Web2Application plugin to sync content, enable WooCommerce features, and more.
- Advanced Customization: Tweak your app’s appearance with simple CSS for a unique look.
Testing and Previewing Your App Before Launch
Before submitting to the App Store, you can:
- Download a test APK for Android or use Apple TestFlight for iOS
- Check navigation, push notifications, and content updates
- Ensure your app meets Apple’s design and functionality guidelines
Web2Application’s dashboard makes it easy to iterate and perfect your app before going live.
Tips for a Smooth App Store Submission (and Avoiding Rejection)
- Follow Apple’s Guidelines: Make sure your app offers real value and native features (push, navigation, etc.).
- Use a Unique App Icon & Splash Screen: Avoid generic branding for better chances of approval.
- Test Thoroughly: Use TestFlight to catch issues before review.
- Provide Accurate Store Listing Info: Clear descriptions and screenshots help your app stand out.
- Get Support: Web2Application offers expert help for premium users during the submission process.
Ready to Turn Your Website Into an iPhone App?
Transform your website into a polished iOS app—no coding, no hassle. With Web2Application, you unlock native features, deliver a better user experience, and reach new audiences on the App Store. Sign up free today and see the difference for yourself!
Frequently Asked Questions
What do I need to turn my website into an iPhone app?
You need your website URL, an app icon and splash screen, and an Apple Developer account (for App Store submission). With Web2Application, you don’t need to code—just follow the visual setup process.
Will my app work with WordPress or WooCommerce?
Yes! Web2Application offers a WordPress plugin for seamless integration, including WooCommerce product sync and advanced features.
Can I send push notifications to my app users?
Absolutely. Web2Application enables push notifications through Google Firebase. You can send updates, offers, and news directly from your dashboard.
How do I test my app before submitting to the App Store?
You can preview your app using Apple TestFlight or download a test APK for Android. This lets you check design, navigation, and features before launch.
What if my app is rejected by Apple?
Web2Application guides you through Apple’s requirements and helps you add native features to meet guideline 4.2. Premium users get expert support for resubmission.
Ready to turn your site into an app?
Create your app with Web2Application — convert your website to Android and iOS apps.

